申请免费 SSL 证书
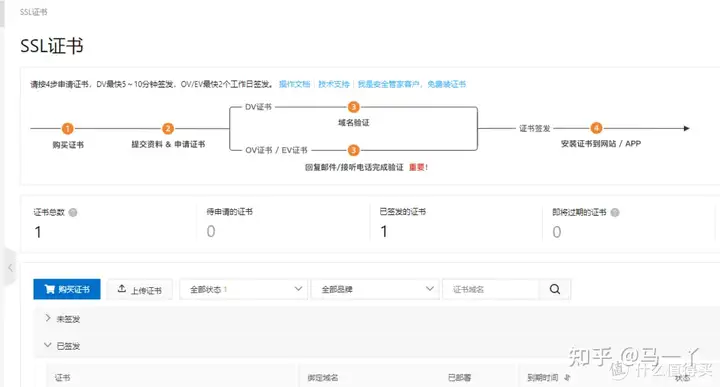
一、登陆阿里云,进入证书服务。
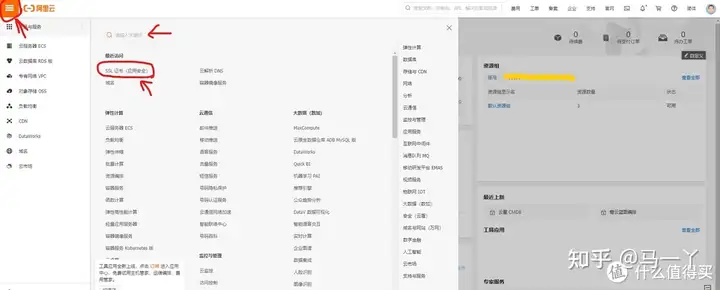
登陆阿里云以后,点击控制台。进入控制台以后,点击左侧“阿里云”三个字旁边的菜单键,选择“产品和服务”。在产品和服务选择“SSL证书(应用安全)”或者直接搜索框里搜索“SSL证书”。
二、购买证书。
直接点击中间最闪耀的“证书购买”就行!


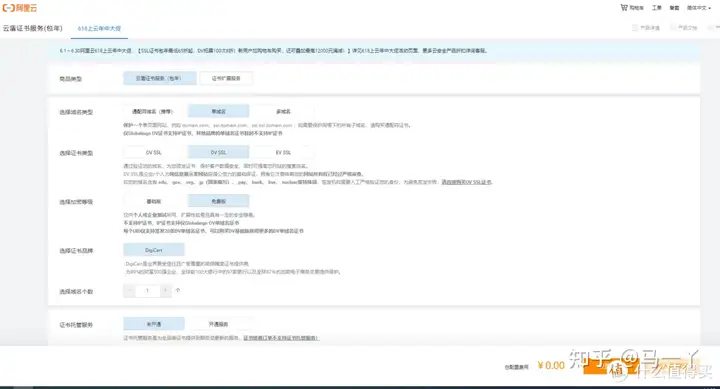
在购买证书时,按照下面的方式选择。商品类型选择“云盾证书(包年)”,然后域名类型选择“单域名”,证书类型选择“DV SSL”,加密等级就是“免费版”,证书品牌“DigCert”,证书托管不要开通,还有期限最多选择1年,1年以后需要再次申请。完成选择后,点击支付。
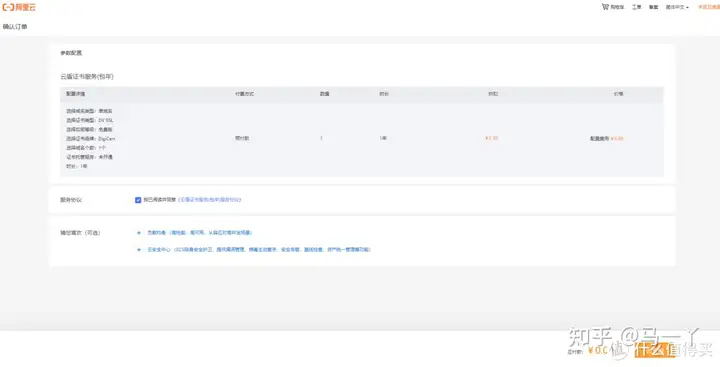
完成后,可以在刚才控制台-SSL证书里发现出现一条未签发的证书。
三、证书申请。
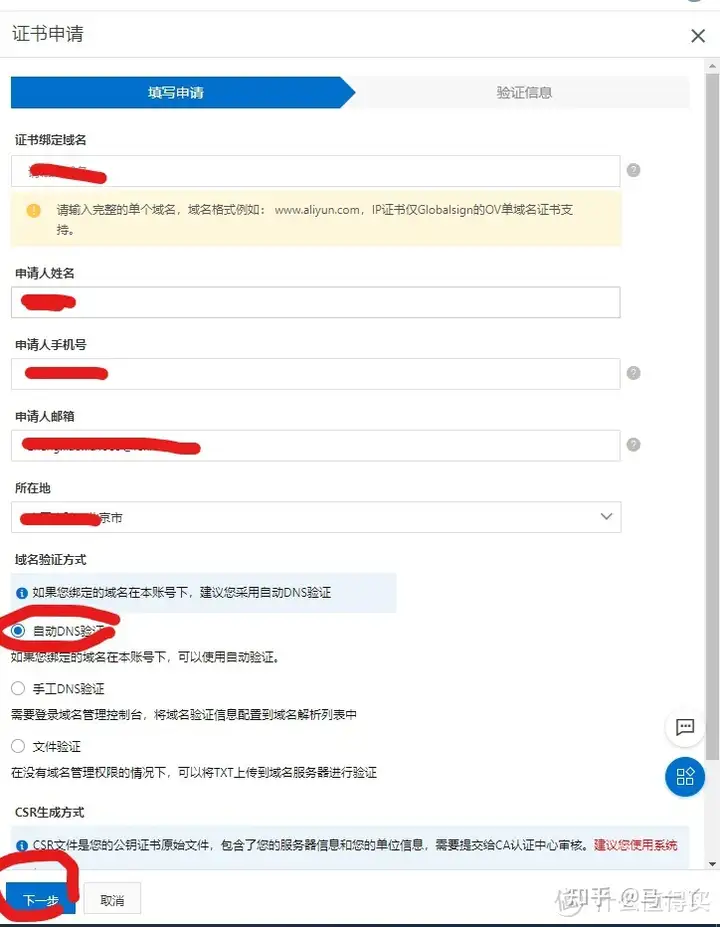
购买证书以后,还需要填写资料等待相关部门签发。具体就是在SSL证书管理那里,点击证书申请。然后如实填写资料。

划红线的地方填写一下就好然后下一步不需要更改,提交就行。然后等待审核签发吧!


四、证书签发下载
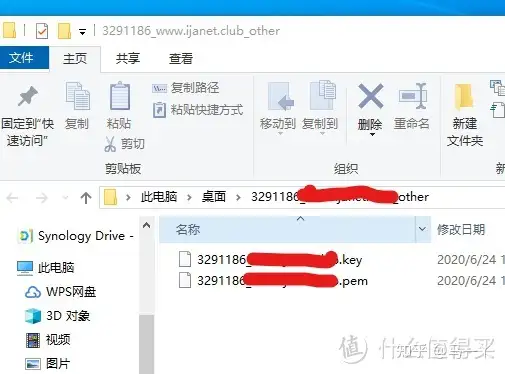
证书签发可能需要等一段时间,工作日一般半个小时左右吧。签发好后,下载证书即可。下载后有两个文件key和pem文件。

SSL证书部署
一、群晖新增证书
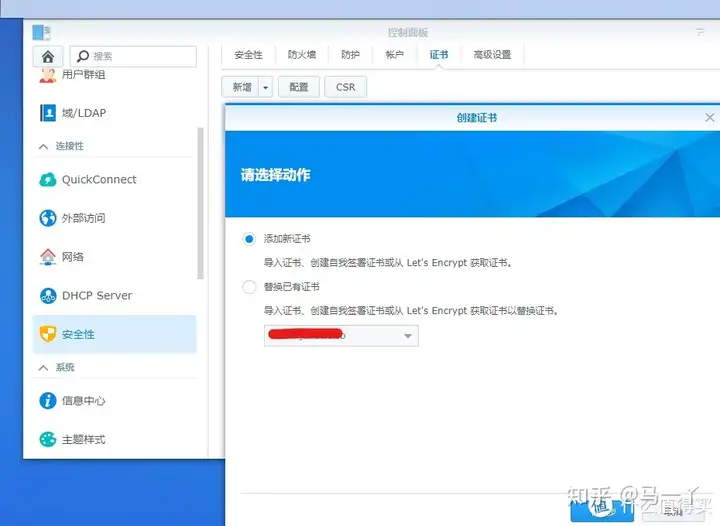
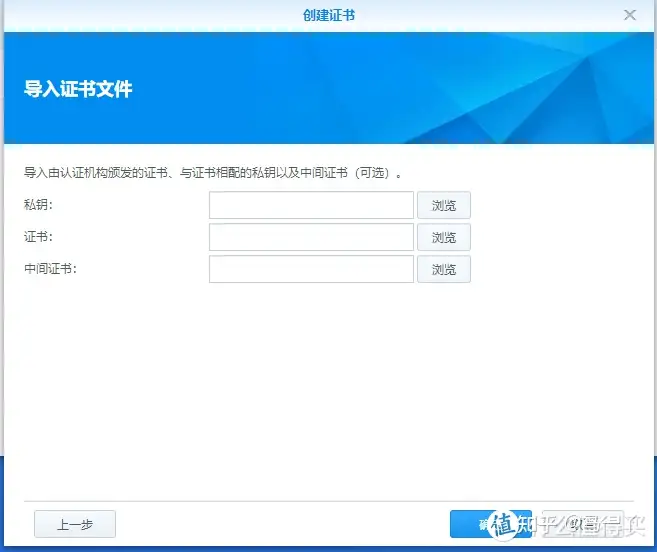
在群晖控制面板-安全性-证书 新增证书。选择添加新证书,下一步。
选择导入证书,下一步。
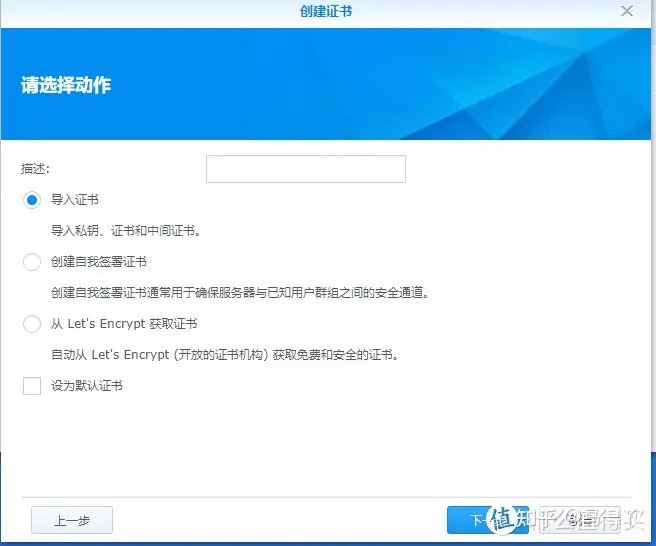
导入证书,选择刚才的.key文件和.pem文件。中间证书不用选择。最后选择确定即可。
二、新签发证书部署
在群晖的控制面板-应用程序门户-编辑各个应用程序的HTTPS端口。
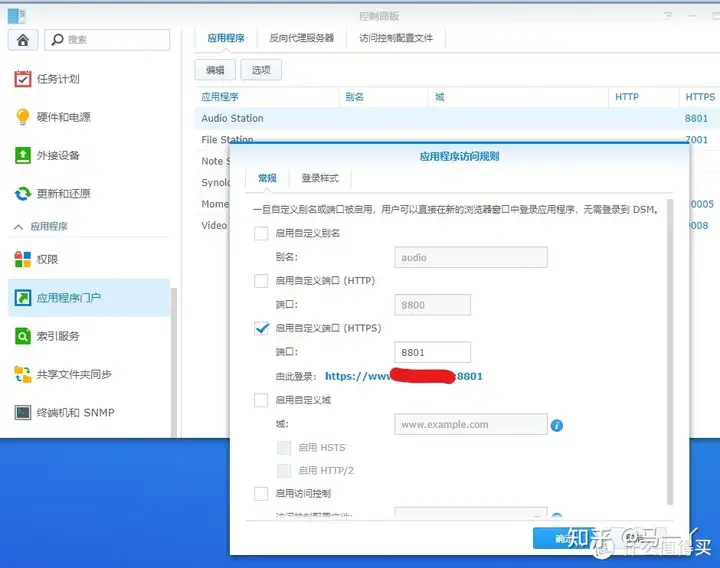
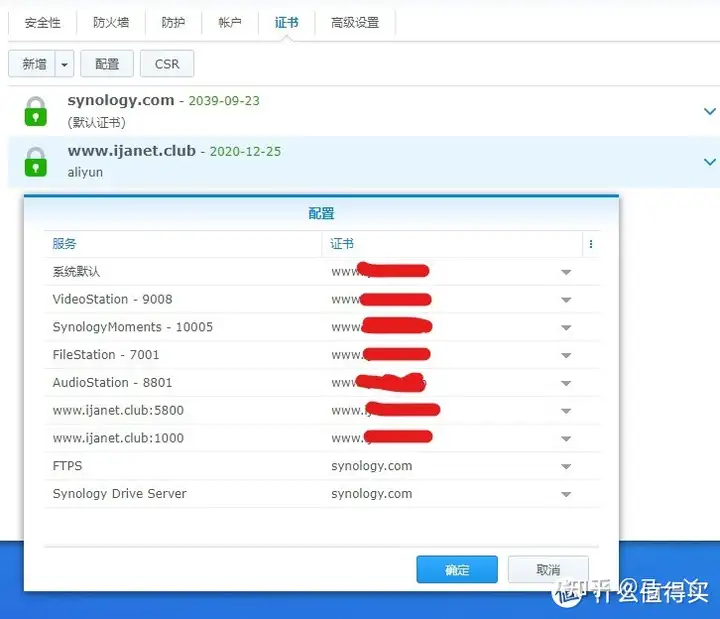
端口开放了以后,在控制面板-安全性-证书中配置刚才上传的证书。选中后,点击配置。左侧是各个访问端口,右侧是当前选用的证书,在右侧选择你刚刚申请的证书,然后保存确定即可。
HTTPDDNS解析
curl -sL --connect-timeout 3 "tdns.cupker.cn/d?dn=$aliddnsipv6_name&type=AAAA"
curl -sL --connect-timeout 3 "119.29.29.29/d?dn=$aliddnsipv6_name&type=AAAA"阿里云httpdns。
腾讯云HTTPdns
通过httpdns。我们可以查询域名与IP地址之间的联系,是我们可以定位到域名背后的IP地址
赶快来白嫖吧
腾讯云 DNS 方案 DoH 和 DoT 开始公测 2020-07-27 16:04 IT之家(骑士) IT之家7月27日消息 腾讯云DNSPod近期表示,DNS传输协议方案DoT/DoH开始公测了。
DoT 全称是 DNS over TLS,它使用 TLS 协议来传输 DNS 协议。TLS 协议是目前互联网最常用的安全加密协议之一,我们访问 HTTPs 的安全基础就是基于 TLS 协议的。相比于之前使用无连接无加密的 UDP 模式,TLS 本身已经实现了保密性与完整性。
TLS 协议的基本思路是证书 + 加密机制,双管齐下保证安全。证书相当于申请了一个合法的身份证,当客户端向服务器发起连接的时候,双方会相互校验一下身份,服务器把证书给客户端,客户端来校验证书的内容和合法性。
握手协议则是用的公钥加密法:首先,客户端会向服务器端索要并验证公钥,验证后双方会协商生成 “对话密钥”,类似于两个人独有的摩斯密码,在此之后,双方就会采用对话密钥进行加密通信。
DoH 全称是 DNS over HTTPs,它使用 HTTPs 来传输 DNS 协议。DoH 的安全原理与 DoT 一样,他们之间的区别只在于:DoH 有了 HTTP 格式封装,更加通用。
IT之家了解到,DoT 在专用端口上通过 TLS 连接 DNS 服务器,而 DoH 是基于使用 HTTP 应用程序层协议,将查询发送到 HTTPS 端口上的特定 HTTP 端点 , 这里造成的外界感知就是端口号的不同,DoT 的端口号是 853,DoH 端口号 443。
腾讯云相关团队表示,通过对客户端侧改造和优化,采用本地缓存,提前预取,连接复用等技术方案,积极优化整体流程,实现了与原 DNS 协议相近的时延效果。
其次,是客户端和服务器端生成的对话密钥是对称加密,运算速度非常快,而服务器公钥只用于加密 “对话密钥” 本身,这样就减少了加密运算的消耗时间。
DNSPod 表示,一直以来对 DNS 安全都非常关注,目前已经 DoT/DoH 方案已经正式开放公测:为 DNSPod 用户的信息和隐私安全保驾护航。
DoT 的服务器地址:dns.pub 或者 doh.pub
DoH 的地址:https://doh.pub/dns-query
PC 端教程:
让 DNSPod 保护您的网页安全也非常简单,如果您使用的是 Chrome 浏览器(83 及以上),只需要在 Chrome 浏览器的设置项中设置好 DNS 访问安全选项即可。操作步骤如下:
进入到 Chrome 浏览器设置页面,在设置搜索框中搜索 DNS。
1:点击搜索结果中的 “安全”,往下拉,就能看到 DNS 安全设置。
2:输入 DNS 安全服务提供商地址:
如果你使用的是 Chrome 浏览器(78-82),那么首先你需要
1:点击:chrome://flags/#dns-over-https
2:将 Secure DNS lookups 这里的 Default 修改为 Enabled。
3:进入网络设置 – 更改适配器选项 – 右键 – 选择 ipv4 – 点击属性
4:点击高级 – 选择 dns – 在弹出 “DNS 服务器”下方框中输入:162.14.21.56 或者 162.14.21.178(正式上线后会更改,请同步关注)
使用 FireFox 也可轻松设置,与 Chrome 步骤类似。进入到设置页面,搜索 “dns”,点击 “网络设置”,下拉后勾选 “DNS over HTTPS“,输入 DNS 安全服务商地址 https://doh.pub/dns-query 即可。
至此,你的 DNS 请求就以加密的方式安全的送达到了 DNSPod,从此岁月静好。
其中alidns_ip是http://dns.alidns.com 的A记录,可以是以下两个地址之一 :223.5.5.5,223.6.6.6。和非TLS API)
https://dns.alidns.com/resolve?
http://dns.alidns.com/resolve?
注意
其中alidns_ip是http://dns.alidns.com 的A记录,可以是以下两个地址之一 :223.5.5.5,223.6.6.6。
Docker 设置
安装docker
 ” data-caption=”” data-size=”normal” data-rawwidth=”2114″ data-rawheight=”1144″ class=”origin_image zh-lightbox-thumb lazy” width=”2114″ data-original=”https://pic4.zhimg.com/v2-3c8ca24c82f1f457597ec3b4fd039807_r.jpg” data-actualsrc=”https://pic4.zhimg.com/v2-3c8ca24c82f1f457597ec3b4fd039807_b.jpg” data-original-token=”v2-b8290131907b1ecd8d56530e2ab3b746″>
在左侧单机映像,然后选中刚刚下载的映像,单机第一行的启动
 ” data-caption=”” data-size=”normal” data-rawwidth=”1406″ data-rawheight=”1002″ class=”origin_image zh-lightbox-thumb lazy” width=”1406″ data-original=”https://pic4.zhimg.com/v2-40cfc7ea4fef86be7b3831f0a80e06df_r.jpg” data-actualsrc=”https://pic4.zhimg.com/v2-40cfc7ea4fef86be7b3831f0a80e06df_b.jpg” data-original-token=”v2-794025d8c119e8210d8465d2d68c5d4b”>
这里我点击左下角的高级设置按钮,然后进入配置窗口,在配置窗口中单机环境选卡:
 ” data-caption=”” data-size=”normal” data-rawwidth=”664″ data-rawheight=”403″ class=”origin_image zh-lightbox-thumb lazy” width=”664″ data-original=”https://pic1.zhimg.com/v2-ad3c19dad836e0b5ec0aa445ac2bc280_r.jpg” data-actualsrc=”https://pic1.zhimg.com/v2-ad3c19dad836e0b5ec0aa445ac2bc280_b.jpg” data-original-token=”v2-94dc1d40efe6fa4b931069834cb6c96e”>
此时会弹出提示窗口:云账号AccessKey是您访问阿里云API的密钥,具有该账户完全的权限,请务必妥善保管。请勿通过任何方式(如Github等)将AccessKey公开至外部渠道,以免被恶意利用而造成安全威胁。强烈建议您遵循阿里云安全最佳实践,使用RAM子用户AccessKey来进行API调用。
 ” data-caption=”” data-size=”normal” data-rawwidth=”2036″ data-rawheight=”1186″ class=”origin_image zh-lightbox-thumb lazy” width=”2036″ data-original=”https://pic4.zhimg.com/v2-6fe4c81bc545d1606a40b3a8f31c08bf_r.jpg” data-actualsrc=”https://pic4.zhimg.com/v2-6fe4c81bc545d1606a40b3a8f31c08bf_b.jpg” data-original-token=”v2-f8633e0438dd8752f76d899e7fd2ed71″>
填写一个用户名和说信息,勾选open API选项就可以了,这个账户不需要控制台登录权限的。
 ” data-caption=”” data-size=”normal” data-rawwidth=”2396″ data-rawheight=”938″ class=”origin_image zh-lightbox-thumb lazy” width=”2396″ data-original=”https://pic3.zhimg.com/v2-542dc38739a39cb860f7a05205caa062_r.jpg” data-actualsrc=”https://pic3.zhimg.com/v2-542dc38739a39cb860f7a05205caa062_b.jpg” data-original-token=”v2-894b0d29d1f8bee18190efb25c8ee39b”>
 ” data-caption=”” data-size=”normal” data-rawwidth=”1228″ data-rawheight=”862″ class=”origin_image zh-lightbox-thumb lazy” width=”1228″ data-original=”https://pic1.zhimg.com/v2-c3feb656a54bf0acee6ff11bb9031bb0_r.jpg” data-actualsrc=”https://pic1.zhimg.com/v2-c3feb656a54bf0acee6ff11bb9031bb0_b.jpg” data-original-token=”v2-e0c9a331b5a061d206e3cf0e8ff4a1eb”>
单击添加权限
 ” data-caption=”” data-size=”normal” data-rawwidth=”1106″ data-rawheight=”1140″ class=”origin_image zh-lightbox-thumb lazy” width=”1106″ data-original=”https://pic2.zhimg.com/v2-f3593fb0539be2ccc1402511f99b75b1_r.jpg” data-actualsrc=”https://pic2.zhimg.com/v2-f3593fb0539be2ccc1402511f99b75b1_b.jpg” data-original-token=”v2-e824a127b57be69e3a140ae638685a8b”>
单机完成后,可以看到已经被赋予dns管理权限
 ” data-caption=”” data-size=”normal” data-rawwidth=”1378″ data-rawheight=”1140″ class=”origin_image zh-lightbox-thumb lazy” width=”1378″ data-original=”https://pic1.zhimg.com/v2-83ea3d5e121680651259bc67d5502e84_r.jpg” data-actualsrc=”https://pic1.zhimg.com/v2-83ea3d5e121680651259bc67d5502e84_b.jpg” data-original-token=”v2-66777c29fda815cdfb08d2d2bc953537″>
单击创建AccessKey,会让我们收集验证
 ” data-caption=”” data-size=”normal” data-rawwidth=”1472″ data-rawheight=”898″ class=”origin_image zh-lightbox-thumb lazy” width=”1472″ data-original=”https://pic4.zhimg.com/v2-a6d90c558784093fe212e535ca09da1f_r.jpg” data-actualsrc=”https://pic4.zhimg.com/v2-a6d90c558784093fe212e535ca09da1f_b.jpg” data-original-token=”v2-483dbe5d3dca822645476c846a693144″>
配置域名解析
回到群晖,在环境选项卡中输入我们得到的id和secret
AKID:自己域名的AccessKey ID
AKSCT:自己域名的Access Key Secret
Domain:设置访问的域名,可以根据自己的喜欢设置一级或二级域名。如 你的域名为http://aa.com那就可以http://pan.aa.com这样到时就可以使用http://pan.aa.com来访问了。
REDO:设置多少分钟更新一次dns设置,我这里设置的60秒,即1分钟
 ” data-caption=”” data-size=”normal” data-rawwidth=”2108″ data-rawheight=”1108″ class=”origin_image zh-lightbox-thumb lazy” width=”2108″ data-original=”https://pic4.zhimg.com/v2-59109003680e60b5307846b8b6c98ebf_r.jpg” data-actualsrc=”https://pic4.zhimg.com/v2-59109003680e60b5307846b8b6c98ebf_b.jpg” data-original-token=”v2-42ee0e9210e69d3782df69317cba169f”>
这时我们可以回到阿里云中查看dns记录是否已经正确添加和更新。

更加简单和一堵
</code></pre>
</div>
<h3>shell代码</h3>
<p>ipv6 的 Type 为 AAAA</p>
<p>ipv4 的 Type 为 A</p>
<p>其中的重点配置还在于获取设备的地址及当前域名解析的地址</p>
<p>在比较后判断是否需要更新</p>
<div>
<pre><code><span>#!/bin/sh</span>
<span>#The script is best to run with bash. The command format is bash aliddns</span>
<span>#Change your Ali AK in the quotation marks below</span>
<span>aliddnsipv6_ak</span><span>=</span><span>) #Change your Alibaba SK in the quotation marks below. To put it bluntly, these are the account and password
aliddnsipv6_sk="Access Key Secret"
#Change the following quotation marks into the prefix of the domain name you want to resolve. If it is the root domain name, fill in it directly@
aliddnsipv6_name1="area"
#Change the following quotation marks to the main domain name you want to resolve, for example: baidu com
aliddnsipv6_domain="domain.cn"
#Change the parsing switching time you need in the quotation marks below. Alibaba defaults to a maximum of 600 seconds, which can be reduced by spending money
aliddnsipv6_ttl="600"
#Judge whether it contains @ because the resolution containing @ is directly reported to xxx COM, instead of blindly reporting as @ xxx. com
if [ "$aliddnsipv6_name1" = "@" ]
then
aliddnsipv6_name=$aliddnsipv6_domain
else
aliddnsipv6_name=$aliddnsipv6_name1.$aliddnsipv6_domain
fi
#Make time and record good moments
echo "Now Time:$(date)"
#Here are two ways to get the IPv6 address of your local machine, so that one can hang up and the other can be backed up. Of course, you can also use the if statement to judge. If the first one doesnt work, use the second...
#If you want to resolve IPv4, put the following v6 ident. Replace me with v4 ident. me
#v6.ident. If me fails, switch to IPv6 directly ip. sb
# ipv6=`curl -sL --connect-timeout 3 v6.ident.me`
# if [ "$ipv6" = "" ]
# then
# ipv6=$(ip -o addr show |grep -v deprecated|grep inet6 [^f:]|sed -nr s#^.+? +inet6 ([a-f0-9:]+)/.+? scope global .*? valid_lft ([0-9]+sec) .*#2 1#p|grep ff:fe|sort -nr|head -n1|cut -d -f2)
# Print out the current local IPv6 address. What did you do to compare the program
echo "LocalHost IP:$ipv6"
#The following is to get the IPv6 address currently resolved by Alibaba for you. If you want to resolve IPv4, replace AAAA with a
########It is recommended to use the default one, because after you update DNS, dns9 hichina. COM is effective immediately########
#To resolve IPv4, you need to delete &type=AAA
#current_ipv6=`nslookup -query=AAAA $aliddnsipv6_name dns9.hichina.com 2>&1 | grep Address: | tail -n1 | awk {print $NF}`
current_ipv6=$(curl -sL --connect-timeout 3 "tdns.cupker.cn/d?dn=$aliddnsipv6_name&type=AAAA")
# tdns.cupker.cn bind tdns.cupker.cn
#$(ip -o addr show |grep -v deprecated|grep inet6 [^f:]|sed -nr s#^.+? +inet6 ([a-f0-9:]+)/.+? scope global .*? valid_lft ([0-9]+sec) .*#2 1#p|grep ff:fe|sort -nr|head -n1|cut -d -f2)
# $(curl -sL --connect-timeout 3 "119.29.29.29/d?dn=$aliddnsipv6_name&type=AAAA")
#Print it again for you to see clearly
echo "Current Alibaba resolution ip:$current_ipv6"
#If the local IPv6 and Alibaba resolve the same, Ill pass
if [ "$ipv6" = "$current_ipv6" ]
then
echo "You see, the IP hasnt changed and doesnt need to be updated. Im leaving..."
exit
#If its different, Ill start updating it
else
unset aliddnsipv6_record_id
fi
#The timestamp format should be correct
timestamp=$(date -u "+%Y-%m-%dT%H%%3A%M%%3A%SZ")
#The following are Alibaba related, all of which are required in various formats, as well as obtaining recordid and so on. Lets jump to the update record and go down
urlencode() {
# urlencode <string>
out=""
while read -n1 c
do
case $c in
[a-zA-Z0-9._-]) out="$out$c" ;;
*) out="$out$(printf %%%02X "$c")" ;;
esac
done
echo -n $out
}
enc() {
echo -n "$1" | urlencode
}
send_request() {
local args="AccessKeyId=$aliddnsipv6_ak&Action=$1&Format=json&$2&Version=2015-01-09"
local hash=$(echo -n "GET&%2F&$(enc "$args")" | openssl dgst -sha1 -hmac "$aliddnsipv6_sk&" -binary | openssl base64)
curl -s "http://alidns.aliyuncs.com/?$args&Signature=$(enc "$hash")"
}
get_recordid() {
grep -Eo "RecordId":"[0-9]+" | cut -d: -f2 | tr -d "
}
#Here ----------- the following type=aaaa is the only difference between updating IPv6 and IPv4. The rest of the update codes are the same, so it can be understood in this way -- line feed
#For example, the following can be changed from AAAA to a
query_recordid() {
send_request "DescribeSubDomainRecords" "SignatureMethod=HMAC-SHA1&SignatureNonce=$timestamp&SignatureVersion=1.0&SubDomain=$aliddnsipv6_name&Timestamp=$timestamp&Type=AAAA"
}
update_record() {
send_request "UpdateDomainRecord" "RR=$aliddnsipv6_name1&RecordId=$1&SignatureMethod=HMAC-SHA1&SignatureNonce=$timestamp&SignatureVersion=1.0&TTL=$aliddnsipv6_ttl&Timestamp=$timestamp&Type=AAAA&Value=$(enc $ipv6)"
}
add_record() {
send_request "AddDomainRecord&DomainName=$aliddnsipv6_domain" "RR=$aliddnsipv6_name1&SignatureMethod=HMAC-SHA1&SignatureNonce=$timestamp&SignatureVersion=1.0&TTL=$aliddnsipv6_ttl&Timestamp=$timestamp&Type=AAAA&Value=$(enc $ipv6)"
}
if [ "$aliddnsipv6_record_id" = "" ]
then
aliddnsipv6_record_id=$(query_recordid | get_recordid)
fi
if [ "$aliddnsipv6_record_id" = "" ]
then
aliddnsipv6_record_id=$(add_record | get_recordid)
echo "New parsing has been added$aliddnsipv6_name $ipv6 $aliddnsipv6_record_id"
else
update_record $aliddnsipv6_record_id
echo "New parsing has been added $aliddnsipv6_name as $ipv6"
fi
#Change your Alibaba SK in the quotation marks below. To put it bluntly, these are the account and password
aliddnsipv6_sk="Access Key Secret"
#Change the following quotation marks into the prefix of the domain name you want to resolve. If it is the root domain name, fill in it directly@
aliddnsipv6_name1="area"
#Change the following quotation marks to the main domain name you want to resolve, for example: baidu com
aliddnsipv6_domain="domain.cn"
#Change the parsing switching time you need in the quotation marks below. Alibaba defaults to a maximum of 600 seconds, which can be reduced by spending money
aliddnsipv6_ttl="600"
#Judge whether it contains @ because the resolution containing @ is directly reported to xxx COM, instead of blindly reporting as @ xxx. com
if [ "$aliddnsipv6_name1" = "@" ]
then
aliddnsipv6_name=$aliddnsipv6_domain
else
aliddnsipv6_name=$aliddnsipv6_name1.$aliddnsipv6_domain
fi
#Make time and record good moments
echo "Now Time:$(date)"
#Here are two ways to get the IPv6 address of your local machine, so that one can hang up and the other can be backed up. Of course, you can also use the if statement to judge. If the first one doesnt work, use the second...
#If you want to resolve IPv4, put the following v6 ident. Replace me with v4 ident. me
#v6.ident. If me fails, switch to IPv6 directly ip. sb
# ipv6=`curl -sL --connect-timeout 3 v6.ident.me`
# if [ "$ipv6" = "" ]
# then
# ipv6=$(ip -o addr show |grep -v deprecated|grep inet6 [^f:]|sed -nr s#^.+? +inet6 ([a-f0-9:]+)/.+? scope global .*? valid_lft ([0-9]+sec) .*#2 1#p|grep ff:fe|sort -nr|head -n1|cut -d -f2)
# Print out the current local IPv6 address. What did you do to compare the program
echo "LocalHost IP:$ipv6"
#The following is to get the IPv6 address currently resolved by Alibaba for you. If you want to resolve IPv4, replace AAAA with a
########It is recommended to use the default one, because after you update DNS, dns9 hichina. COM is effective immediately########
#To resolve IPv4, you need to delete &type=AAA
#current_ipv6=`nslookup -query=AAAA $aliddnsipv6_name dns9.hichina.com 2>&1 | grep Address: | tail -n1 | awk {print $NF}`
current_ipv6=$(curl -sL --connect-timeout 3 "tdns.cupker.cn/d?dn=$aliddnsipv6_name&type=AAAA")
# tdns.cupker.cn bind tdns.cupker.cn
#$(ip -o addr show |grep -v deprecated|grep inet6 [^f:]|sed -nr s#^.+? +inet6 ([a-f0-9:]+)/.+? scope global .*? valid_lft ([0-9]+sec) .*#2 1#p|grep ff:fe|sort -nr|head -n1|cut -d -f2)
# $(curl -sL --connect-timeout 3 "119.29.29.29/d?dn=$aliddnsipv6_name&type=AAAA")
#Print it again for you to see clearly
echo "Current Alibaba resolution ip:$current_ipv6"
#If the local IPv6 and Alibaba resolve the same, Ill pass
if [ "$ipv6" = "$current_ipv6" ]
then
echo "You see, the IP hasnt changed and doesnt need to be updated. Im leaving..."
exit
#If its different, Ill start updating it
else
unset aliddnsipv6_record_id
fi
#The timestamp format should be correct
timestamp=$(date -u "+%Y-%m-%dT%H%%3A%M%%3A%SZ")
#The following are Alibaba related, all of which are required in various formats, as well as obtaining recordid and so on. Lets jump to the update record and go down
urlencode() {
# urlencode <string>
out=""
while read -n1 c
do
case $c in
[a-zA-Z0-9._-]) out="$out$c" ;;
*) out="$out$(printf %%%02X "$c")" ;;
esac
done
echo -n $out
}
enc() {
echo -n "$1" | urlencode
}
send_request() {
local args="AccessKeyId=$aliddnsipv6_ak&Action=$1&Format=json&$2&Version=2015-01-09"
local hash=$(echo -n "GET&%2F&$(enc "$args")" | openssl dgst -sha1 -hmac "$aliddnsipv6_sk&" -binary | openssl base64)
curl -s "http://alidns.aliyuncs.com/?$args&Signature=$(enc "$hash")"
}
get_recordid() {
grep -Eo "RecordId":"[0-9]+" | cut -d: -f2 | tr -d "
}
#Here ----------- the following type=aaaa is the only difference between updating IPv6 and IPv4. The rest of the update codes are the same, so it can be understood in this way -- line feed
#For example, the following can be changed from AAAA to a
query_recordid() {
send_request "DescribeSubDomainRecords" "SignatureMethod=HMAC-SHA1&SignatureNonce=$timestamp&SignatureVersion=1.0&SubDomain=$aliddnsipv6_name&Timestamp=$timestamp&Type=AAAA"
}
update_record() {
send_request "UpdateDomainRecord" "RR=$aliddnsipv6_name1&RecordId=$1&SignatureMethod=HMAC-SHA1&SignatureNonce=$timestamp&SignatureVersion=1.0&TTL=$aliddnsipv6_ttl&Timestamp=$timestamp&Type=AAAA&Value=$(enc $ipv6)"
}
add_record() {
send_request "AddDomainRecord&DomainName=$aliddnsipv6_domain" "RR=$aliddnsipv6_name1&SignatureMethod=HMAC-SHA1&SignatureNonce=$timestamp&SignatureVersion=1.0&TTL=$aliddnsipv6_ttl&Timestamp=$timestamp&Type=AAAA&Value=$(enc $ipv6)"
}
if [ "$aliddnsipv6_record_id" = "" ]
then
aliddnsipv6_record_id=$(query_recordid | get_recordid)
fi
if [ "$aliddnsipv6_record_id" = "" ]
then
aliddnsipv6_record_id=$(add_record | get_recordid)
echo "New parsing has been added$aliddnsipv6_name $ipv6 $aliddnsipv6_record_id"
else
update_record $aliddnsipv6_record_id
echo "New parsing has been added $aliddnsipv6_name as $ipv6"
fi
获取本机地址(通过命令行)
以下是shell脚本,会显示出ipv4地址,和最新的ipv6(eui64)地址
#!/bin/sh
ip addr show|grep -A1 inet [^f:]|sed -nr s#^ +inet ([0-9.]+)/[0-9]+ brd [0-9./]+ scope global .*#1#p
ip addr show|grep -v deprecated|grep -A1 inet6 [^f:]|grep -v ^--|sed -nr :a;N;s#^ +inet6 ([a-f0-9:]+)/.+? scope global .*? valid_lft ([0-9]+sec) .*#2 1#p;Ta|grep ff:fe|sort -nr|head -n1|cut -d  -f2
显示ipv6的脚本执行步骤是,
- ip addr show 或 ip addr show XXX
- 去除 deprecated 地址
- 挑出inet6地址,并同时显示下一行
- 去掉分组间隔 “–” (如果有的话)
- 把expired时间和ipv6地址,通过正则找出来,并显示在同一行。超时时间在前,ip在后。
- 过滤出eui64地址
- 根据时间的长短,反向排序
- 输出第一行
- 输出第二列(ip)
#!/bin/sh
ip -o addr show|grep inet [^f:]|sed -nr s#.+? +inet ([0-9.]+)/[0-9]+ brd [0-9./]+ scope global .*#1#p
ip -o addr show |grep -v deprecated|grep  inet6 [^f:]|sed -nr s#^.+? +inet6 ([a-f0-9:]+)/.+? scope global .*? valid_lft ([0-9]+sec) .*#2 1#p|grep ff:fe|sort -nr|head -n1|cut -d  -f2
获取本机地址(通过HTTP)
有哪些网站可以获取到呢
IPIP.NETIPCN搜狐IP138Ping, mtr, dig and TCP port check from multiple locationsicanhazip.comComprehensive IP address data, IP geolocation API and database – IPinfo.ioIP Address Lookup / IPv4 / IPv6 – IP.SB方便通过命令查看的
curl https://ip.cn
curl http://pv.sohu.com/cityjson 2>> /dev/null | awk -F ” {print $4}
curl http://icanhazip.com
curl http://ipv4.icanhazip.com
curl http://ipinfo.io/ip
curl ip.sb
相关文章

